Tips For Your First Yoga Class (Or Classes!)

Today, a student walked out about 10 minutes into my class. She'd come in after class had started so I hadn't had a chance to speak to her beforehand like I normally would when there's a face I don't recognise. It turns out she was new to yoga, looking for a relaxing class to start her practice and found herself in a level 2/3 heated flow class😕 I'm disappointed that she had a bad experience and thought that now is a good time to discuss how best to get started practicing yoga in a class environment. 

I highly encourage those new to yoga to start with an introductory beginners course, designed to teach the basics of yoga (I teach one, by the way, on Wednesdays at 8:15pm). A course like this should provide you with the tools to begin your practice safely and mindfully.  But, depending on your schedule and lifestyle, a series isn't always an option. So here are a few tips to get you started in a class environment:

See what's out there: Check out local studios and venues. Many offer a reduced rate on your first class or introductory first month rates.

Taste Test: Once you find a studio, try out different teachers that offer classes at times that fit your schedule. Please don't ever give up on yoga after one class or teacher that you didn't connect with. 

Get to class early: this will give you the chance to meet the teacher beforehand. Tell them you're new to yoga. If you have any injuries you need to modify for you'll want to communicate that too. 

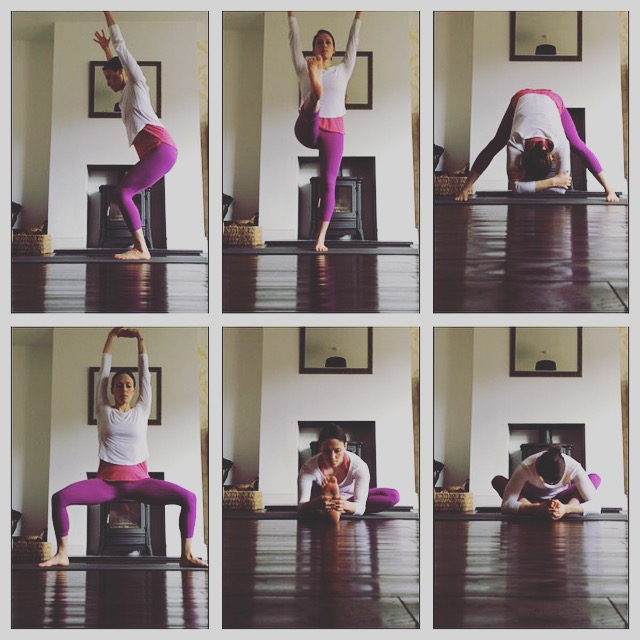
When in doubt, Child's Pose: Get down on all fours, sit your hips back to your heals, rest your forehead down on your mat and breathe.

When class is finished: Pat yourself on the back because you did it!  You rolled out your mat and you got on it. You moved, you breathed, you connected. Well done❤️

For more information about my beginner series, click here.

IMG_9201.PNG

Morning Yoga Sequence

If your body is anything like mine, it takes time to warm up, especially in the morning! I created this less than 20 minute sequence to energise and warm the body slowly to prepare for the day ahead.  Try it and let me know what you think!

http://youtu.be/cqjzwMpMTf8

Source: https://youtu.be/cqjzwMpMTf8

Yoga For Runners & Cyclists

Try this sequence after a run to stretch the hamstrings, quads and hips.  Take 5-10 breaths in each pose and then repeat on the other side.  Hang out in the final pose as long as you have time for. For a gentler option, check out my post below on Yoga For Tight Hips.


Surya Namaskar A (Sun Salutation A)

“… let me repeat that no asana practice is complete without sun worship. Without its focusing of mental energies, yoga practice amounts to little more than gymnastics and, as such, loses meaning and proves fruitless. Indeed the Surya Namaskara should never be mistaken for mere physical excersize –for something incidental, that is, that simply precedes the asanas of yoga. Therefore, it is necessary, before beginning the sun salutations, to pray to Surya [...] to bestow upon us the good fortune of having only good thoughts, of hearing and speaking only good words, and of attaining a sound and strong body, so that we may have a long life and, one day, achieve oneness with God.” -Sri K. Pattabhi Jois, “Suryanamskara”

Surya Namaskar A was what led me to originally fall in love with yoga. At the time, I didn't know what I was doing had a name or a purpose.  I only knew the flow, the breath, the power, the energy and the life I felt moving through these shapes, through this sequence.  Try it and see how it feels.  Let me know what you think. xoxo

The Best Peanut Butter Granola Ever

That's a pretty bold statement, huh? Well, all I can say is if you are looking for a healthy alternative for a treat or a snack, this recipe is really worth your time.  It takes essentially no time to make, it's delicious and it's adaptable.

Ingredients:
2 tbsp Peanut Butter (you could use another nut butter or sun butter instead if you prefer)
2 tbsp Honey (I use raw honey)
1 cup Rolled Oats - I like the biggest oats I can find but any oats will work
1 tsp Vanilla Extract

granola

How you make this recipe depends on your peanut butter. If you PB is soft, just add it to a bowl with the honey and vanilla and stir well.  Add your oats and optional extras and stir. Spread the mixture out evenly on parchment paper on a cookie sheet and place in the oven at 350F/176C for 15 minutes. When you take it out, it may not look done but let it cool and it will set.  Once cool, break it up and enjoy. 

*If your PB is not very easy to stir out of the jar, add it with the honey to a small pan over a low heat and stir until soft and creamy.  Add vanilla and stir.  Then follow instructions above.

*This recipe works great as is but if you want optional extras, try a dash of cinnamon, chocolate chips, raisins, dried fruit, seeds or more nuts. If you think it would taste good, it probably will!

Easy, Delicious Homemade Bread - No Bread Machine Required!

If you've been following my page for a while, you've probably seen me post a link for an AWESOME bread 'boule' or ball. This bread truly is delicious and so so easy.  Below I've explained how I make this bread so you can see that you too, can make your own tasty, fresh bread in very few steps.

breadboule


This isn't my recipe.  The original recipe can be found here: http://www.splendidtable.org/recipes/refrigerator-stored-artisan-boule-with-whole-grains.

** If you are trying to make the switch to wheat bread then start with the flour measurements as they are. If you've already switched to wheat bread, try it with all wheat flour (white whole wheat if you're in the US) and wholemeal (if you're in the UK).

And if I haven't already mentioned it.. the. bread. is. awesome. 


Here are the ingredients:
3 cups plus 2 tbsp lukewarm water (or 25ox/710grams)
1 package granulated yeast (or 2 1/4 teaspoons)
1 1/2 tablespoons kosher or other coarse salt (I only use 1tbsp)
3 1/2 cups all-purpose flour (or 17 oz./490g)
3 cups whole wheat or wholemeal flour (or 13 1/2 oz./385g)
Parchment paper
**if you have kitchen scales, use them for the flour as this seems to yield the best result**


Things you'll need:
Large container with a lid.  Make sure it will fit in your fridge!
Medium bowl for measuring out the flour.  *If your scales have a bowl, you don't need an extra bowl.
Wooden spoon.


Directions:
Mix the yeast, salt and water in your container.  Add flours.  Stir until ingredients are mixed but don't over mix.  Put the lid on (not all the way) and let it sit on the counter for 2 hours. 

After 2 hours, you can either make a boule or put the container in the fridge (lid not all the way on) for up to 10 days.

If you're baking a boule now, pull off a big chunk, and using flour because the dough will be sticky, (white or wheat) form a ball as best you can and put it on a parchment lined baking tray. 

Bake for 30 minutes at 450 F/237 C.

*The recipe says to put a pan of water at the bottom of the oven while the boule cooks.  It also says to score the top. I almost always forget to do these steps and have never noticed a difference in the quality of the bread. 

That's it!  Once the timer goes off, let the bread cool for 10 minutes or so (I can never wait that long though).  Enjoy!

It's really hard to go wrong with this bread.  I usually switch the flour amounts to use more wholemeal flour than white flour. And if you wanted to make it all with white wheat or wholemeal flour, I bet that would be great too.  Will you try it?  If you do, I would love to know what you think!

Banana 'Ice Cream'

Of the many many things I am grateful for, this recipe is definitely up there near the top of the list.  You can make Banana 'Ice Cream' without any artificial ingredients.  And you don't need an ice cream maker.  All you need are frozen bananas and a food processor or heavy duty blender.  If you've got those, then just put frozen bananas in your blender or food processor and turn it on.  That's it! 

And there are so many different ways to adapt the recipe with optional extras.  Here is my favourite version:

Ingredients:

2 frozen bananas
1tbs peanut butter (all natural, no added oil or sugars)
1/2tsp vanilla extract
1/4c liquid.  I used a little almond milk to make it more like soft-serve ice cream.  Any milk would do though.

If I'm in the mood for chocolate, I add semi-sweet chocolate chips to the blender so they grind down into the ice cream to add a little texture.

Directions:

Put all ingredients into your food processor or blender and blend until smooth and creamy.

*If you are using a blender that isn't heavy duty, you may need more liquid but add as little as possible so you don't thin it out too much. 

**optional extras - chocolate chips, cacao nibs, chopped nuts, a drizzle of honey, maple syrup, a dash of cinnamon.  The options are endless.

Enjoy!


My First Blog Post

"Start now.  Start where you are.  Start with fear.  Start with pain.  Start with doubt.  Start with hands shaking.  Start with voice trembling but start.  Start and don't stop.  Start where you are, with what you have.  Just...start." -unknown

10251386_437168213093453_101665378_n.jpg

I posted this quote a few weeks ago on my Facebook page and I thought maybe some of you could use another reminder.  I know I can.  I’ve been so nervous about starting this blog.  I have doubts, I have fears… But I’ve decided I am just going to start.  So, here goes…Bloggers have a lot to say, right? When I think of bloggers, I think of people who can fill pages with text about something.  And, to be honest, I don't have that much to say.  So why am I going to start blogging if I don't have very much to say?  It's because I used to be someone different…

My journey to being a smoothie obsessed, yoga loving runner has been a long one. A journey that's taken many healthy and not so healthy turns.  I’m sure that at some point along my ongoing journey, I have been in a place similar to where you are now.  Really.

My journey started when I found yoga.  That is when things started to change, to really change. This change didn't happen overnight.  It's still happening, in fact.  But it happened.  I started to care about my body.  Not just what it LOOKED like. But, what if FELT like.  But, when I first found yoga, as much as I enjoyed it and could see my body changing, I still didn't know how to FEEL better. I didn't know what I know now...

I completed my yoga teacher training whilst I was pregnant with my second son.  There I was, living in NJ, immersed in a world of yoga, surrounded by people who took an organic/holistic approach to wellness, and pregnant. I intended to breast feed my son when he was born and suddenly became VERY aware of what I was putting IN my body.  Because what I was putting into my body was going straight into his body.  And that's when things got REAL.  This was when we adopted a new philosophy on eating wholesome foods, avoiding processed ingredients.  And that's when the person I was became a thing of the past.And the rest is history.  

Well, not really… I've spent the last 2 years learning more and more about how to adapt a 'clean' lifestyle that suits our family. So, back to why I'm blogging.  I'm blogging for the people who want to change but don't know how.  Maybe, by sharing my journey, recipes and yoga offerings, someone out there will find that it really IS possible to love your body.  And I want to help people see that when you love your body through yoga, exercise and eating wholesome foods, it really does love you back.

Thanks for reading xoxo